The Map Entry

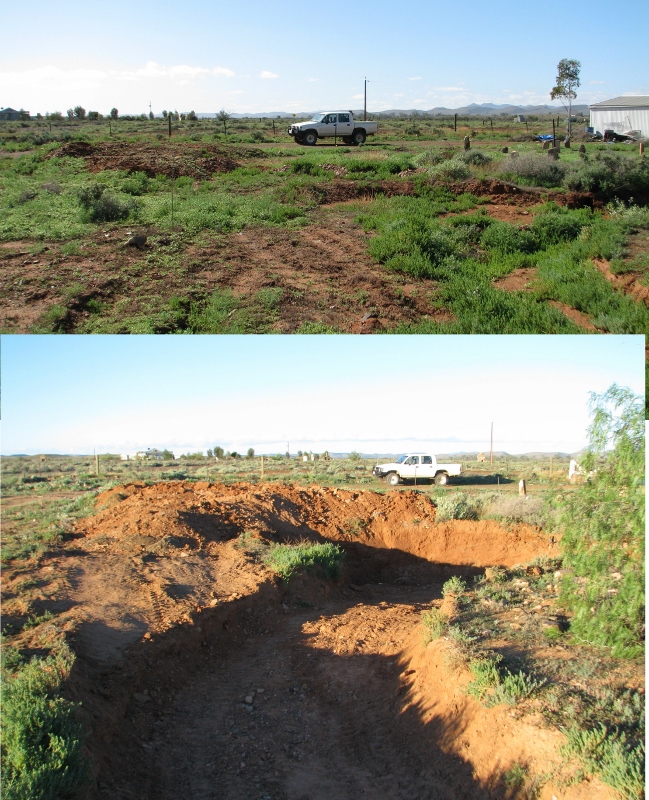
With a project like this, planning is essential and over the years I have created various maps to work out positioning, planting and many other aspects of transforming our yard. In the last year or so though I’ve been working on a more comprehensive image, one which can be used as a base for other maps and will give us a good idea of how things should look when it’s “finished”.

In the last week, I was able to finally find the time to complete the last of the work on this map and convert it to digital form so I could play with it further. The original map is now on the wall in our main room – inspiration for continued productivity.

This map is based on a topographical style so the areas of blue do not represent permanent water necessarily but rather below natural ground level areas which may well fill with water during seasonal downpours. Only the deepest part of the lake is intended to have permanent water to allow for fish and yabbies, with the rest being allowed to evaporate and soak into the ground before being filled again – following the natural pattern for this area. The red lines represent fences and the buildings have cutaways to show floor material and room layout where appropriate.

Large Map Web

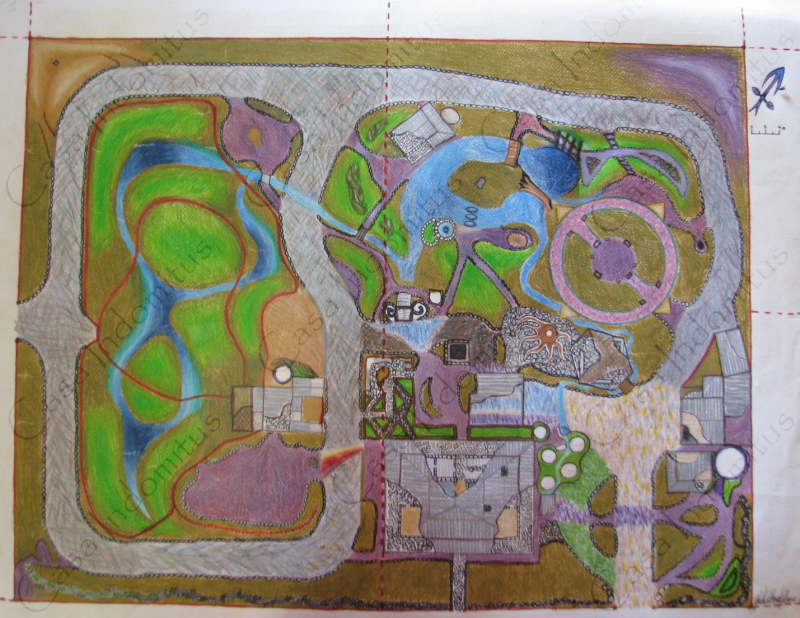
A digital image of the finished map.

Click here for a larger version

Permaculture encourages detailed planning so that trees planted are ‘in the right spot’ for their whole lives which are often far longer than those of the planters. One aspect of this planning is thinking about the frequency of use and locating things conveniently so that your ongoing lifestyle can be as relaxed and productive as possible. It’s an interesting exercise to really think about what aspects of your garden you will use more than others, especially when planning for self-sufficiency.

Permaculture Zones

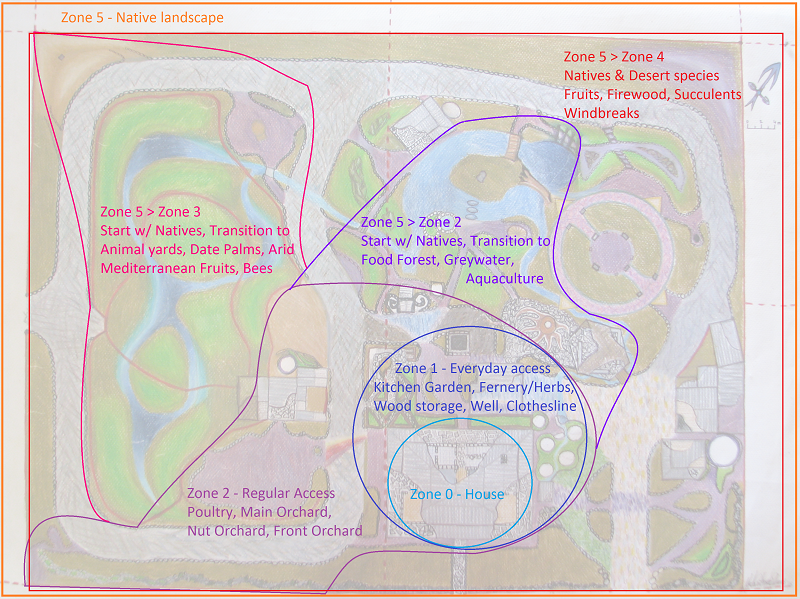
Permaculture Zone mapping for our project

For further information on this method of garden/farm planning see Permaculture Australia or any number of resources available both in print and online.

I have also made some additional detail maps which if you are particularly interested, can be found here:

Location Names

Irrigation Layout

The possibilities for overlays seem almost endless but that will do for playing with this now, back to actually making it happen in the real world.

Beginning to prepare for the larger animals…

As a part of our plan for self sufficiency, we intend to include some larger animals into the mix in the future – for meat, milk, fertiliser and many other purposes. Our location and climate however necessitate a fair bit of preparatory work before we even consider introducing those animals into the fragile environment. Just looking at the local landscape’s reaction to the introduced ruminants of various types (and it’s response to their removal), shows how vital it is to ensure that our block is well prepared for their hard hooves and voracious appetites.

The first stage of working towards being able to provide for the animals we would like to include was the earthworks which shaped the area that was set aside for the animal yards (we will have 3, which will allow for rotation of the different types of animals, reducing each species’ impact on any one area). These earthworks have provided contours to encourage the plantings and also low points which manage water flow from rain events and can be flooded to create wallows for our future miniature pigs.

The second step is to plant the trees and bushes in the zone which will provide the lush environment that will allow our animals to prosper with a minimum of support. The species choice for these areas are predominantly regionally native and designated ruminant fodder options, hopefully allowing for a high yield and low loss. I do intend to spot plant non native fodder species like Bean tree (bauhinia gilva) or Tagasaste (cytisus proliferus) in the lower lying areas, if I can get either to survive to be planted out.

Last year, I began to plant some of these trees, in the area which will become the ‘Front Yard’ but there was still two thirds of the overall area left bare. This year all of that has changed. With our current WWOOFer’s  fantastic help, I’ve got organised this year and we have already planted a total of 280 native seedlings, of which 192 are situated in the animal yards. This might sound like an extreme amount of plants, especially considering the yards comprise of around 2/3 acre. My intention however is to plant this area so densely that when the animals finally arrive, they practically have to eat their way into the yards to move around. In this way I am hoping that we MAY be able to support our small group of creatures without significant outside supplements (and little reliance on the larger local environment).  In fact, both last year’s plantings in this area (120 seedlings) and the ones completed in the last two weeks do not include a couple of species which I have not had luck germinating as yet (casuarina pauper and enchylaena tomentosa) and we also ran out of 3 species this year which would have added an additional 30 or so trees if we had them. Not to worry, I will try again with my seeds over summer this year and we will fill in the gaps next year.

Now the babies will need to be settled in with some new irrigation lines and the growing time begins…

Animal Yards 1 (1)

All three animal yards from the west gateway with our lovely WWOOFer, on his last day here today.

Animal Yards 1 (2)

The new plantings from the east (centre of the block)

Animal Yards 1 (3)

Once these new trees get up in size the fire pit are will be significantly more protected… as will all the areas to the east, including the house.

Animal Yards 1 (4)

One year after planting the front part of this zone the difference is obvious.

I am really looking forward to the growth in these new areas – it will fill out the last major part of the yard which was left bare after the earthworks and greatly reduce the dust, wind and heat profile of the yard. Then of course, there are the animals for which this effort has been expended. Time will tell when the yards will be ready for them – it will all depend on how vigorously these babies grow – but I estimate 5 – 7 years before we introduce our miniature cow to the mix and then we will judge the other animals based on how she impacts the trees, which should be well established by then.

Earthworks 2

The success of the earthworks from the previous year encouraged me to organise to complete the planned major landscaping in May this year. This time I organised to hire a bobcat digger from the nearby pastoral station. This piece of machinery was much better than the dingo digger that I used the previous year being a bit bigger and more comfortable to use. I had access to the machine for two weeks this time so I was confident that I would be able to get everything done. It certainly helped that I had used the dingo the previous year though because it only took me about an hour to get back into the routine of the skid steer mechanism so I was able to be much more productive.

I started by finishing of the ‘lake’, digging the deepest part that I hadn’t been able to finish the previous year and using that dirt to build ‘Hecate’s Hill’ wrapped around that cove. This will be the only part of the waterscape except the reed bed graywater system to have permanent water – being the retreat zone for our fish when the lake is finished… but that’s a ways off yet. After the end of the first day with the bobcat the shape of it was there though.140510 Progress Earthworks 2 (3) (649x800)

The hole looks much deeper than it is because of the hill right next to it – a handy illusion 🙂

With that area of the yard now finished it was time to move onto the second acre where eventually our animal yards will be situated. I had marked out the plan with spraypaint and pegs as that system worked well the previous year, but this design was about three times the size and much more complicated – basically a figure of 8 of ‘waterways’ with varying depths to encourage water flow when we get rain and deep areas to act a pig wallows. These low points were to be surrounded by the corresponding ‘hills’ formed from the dirt I was moving. None of the hills are particularly tall. It took me about 5 days constant work to get it all done but I did!140510 Progress Earthworks 2 (1) (649x800) 140510 Progress Earthworks 2 (2) (649x800)  140510 Progress Earthworks 2 (4) (649x800)It’s quite difficult to get good representative photos of it. I would love to get an aerial shot one day. Now we will leave that area to settle (although I may plant some green mulch species on part of it in spring) for a year before planting it heavily with fodder appropriate natives that will allow our animals to free range as much as possible as well as stabilising the soil, blocking wind and creating a micro-climate that will grow more effective the more trees we can get in.

Before I took the digger back we also got some local shale gravel delivered to spread on paths and clear areas. This fine purple stone is the most amazing material and we are blessed to have access to an abundant supply. I am pretty sure that will all that we had delivered we will have enough for all the landscaping I had planned. I spread it out into smaller piles situated near where it needs to be used but it still needs to be laid out on the paths and clearings – a big job!

It’s so amazing to have all the earthworks done though! The shape of the land is there, like the first pass on a marble sculpture; the details will come but the character of the work can be seen now I think.

Earthworks 1

Our block is not only in an arid environment, with skeletal soils, but it is naturally pretty much flat (maybe a 10cm slope over the length of the block) so we decided quite early on that we would need to do some pretty serious earthworks to increase our chances of success – permaculture works best with slopes. We didn’t want massive mountains but just enough to put some contours in the land and direct the flow of water around the property. So in late April 2013 we drove 6 hours to Adelaide and picked up a hire ‘Dingo Digger’  and bring it back for the week.

I had never done anything like drive a digger so it was a steep learning curve but it was also quite a bit of fun. The transformation of the section of the yard that I was concentrating on was phenomenal and it was really revitalising to see such a step forward in our plans. Of course, it was not all smooth sailing as unfortunately the alternator seized mid project and I had to drive the digger back to Adelaide and pick up a replacement meaning that it was a very exhausting week and a half. The hire company we used were very helpful though and made sure that we were looked after for the trouble we had so it was a positive experience overall.

I still wasn’t very good at taking ‘progress’ photos though so the following is really the best that we have:

Before

130425 Earthworks 1 (4) (800x600)


After

130429 Earthworks 1 (1) (800x600)


The Beginning

Although I have long connection and deep roots when it comes to the town, and have indeed lived here off and on for my whole life, I have also travelled a fair bit and lived in many other places. We always had ‘our house’ here, it was owned by my Grandmother and we could use it whenever we pleased but we didn’t really feel any sense of ownership so nothing really got done. The only thing we did when we were living here once previously (just after we got married) was put up the fence, other than that.. it just sat and did not much except perhaps fall into further disrepair.

After we had our son in 2010 we decided to purchase the property from my Grandma to encourage us to do something more with it. This really worked! in mid 2011 we were in Thailand for three months while my husband did a volunteer assignment and had no fixed address back in Australia so when planning our return we decided to move back to Beltana. I was instantly energised! This is very good because there was, and still is, much to be done.

The following are photos taken in 2009 which illustrate pretty clearly our starting point. It certainly doesn’t look like much, but I knew what was possible – having local friends 7 years ahead of us in this type of project really helps to reassure you when you are looking at a dust bowl with the green of trees in your heart.

We moved back officially on our return to Australia at the start of October 2011 and began the long process of creating our own oasis…