Mission Statement

This is a tale of transformation…

It all starts with a barren 2 acre block in the arid Northern Flinders Ranges, South Australia and a somewhat decrepit 2 room 1870’s stone cottage. With a lot of hard work and a fair amount of magic, we are creating an oasis from these humble beginnings. Our aim is to be as self sufficient as possible, creating increased personal security in an increasingly unsettled world. The method of choice is permaculture with a helping of biodynamics and while the environment and the starting point mean that it will be a longer road than some similar projects it is by no means impossible.

Following you will find windows into our life as we transform our small piece of this ancient land – tales of creation, tree nurturing, animal wrangling, building, renovations and whatever else appears on our horizon…

I hope that by documenting our journey here we might act as inspiration to others who are interested in creating their own personal paradise but feel overwhelmed by the prospect – it really is possible to create a more sustainable and meaningful life no matter where you are.

2016 – 2107 Progress Report

The year has turned again, and it’s been a busy one, although a great deal of the work has been outside of our little block. With home school added to the day, a major renovation project at the other site we are also working on and a couple of sizeable landscaping works at other locations we’ve been a bit distracted from the ‘to do’ list here. None the less, a fair amount of progress has been achieved and according to my massive project schedule we are only a couple of months behind… hopefully we can catch that up in the next few months and stay on track for a completion date somewhere before the end of June 2021 (in time for a nice big Birthday/Housewarming party I’d like to hold).

For my own purposes, here is a list of what we have achieved:

  • Removed the old tank stand!
  • Redesigned the garden beds in the shadehouse to add in paths and raise the beds one sleeper height
  • Finished building the walls and roof of the garden shed
  • Planted the back two animal yards

[Time out for other projects:

  • Designed and landscaped a surburban Newcastle (NSW) yard from bare grass to something a lot more suitable
  • Re-pointed the whole cellar of the Gallery – another building 800m from home
  • Installed a floating floor in the cellar so it can be used as an office space until the office structure is built up here.
  • Worked with community members to design, apply for funding and begin implementing a picnic ground/park in the centre of the town, currently approximately 40% complete

Back to scheduled works…]

  • Put a flagstone floor in the garden shed and filled it with stuff. Still needs cladding and organising but we started the cladding process and will continue as we can.
  • Reorganised the main shed now that the ‘garden’ stuff is out of it. This still needs to be finalised but that doesn’t seem like it’s a task that will ever end.
  • Destroyed the ‘sleepout’ on the western verandah and rebuilt it slightly larger and far more structurally sound so that we have a temporary bedroom – yay for turning the tiny house into a two bedroom one
  • 3/4 built the stone wall around the well – that’s the current project which was begun at the start of the year and then put on pause so the other outside projects could be worked on
  • SO MUCH WEEDING! The downfall of a consistently wet year…

So, without further ado, here are the progress photos for the last year:


As a special treat, seeing we are nominally half way through this project, here are a couple of photos taken in February 2009 that show what it was like before we decided to actually do some real work here.

before-1

From the inside of what is now the outdoor kitchen looking across the block

before-2

Shadehouse, old broken clothesline, now the Faerie Garden

Thanks to all the great WWOOFers and family help we’ve had this year… may the coming year be just as productive!

Passing in the Night


On Saturday, Bill Mollison, co-founder of the Permaculture movement passed from this life. 

While I don’t usually feel the need to comment on the passing of someone I have never actually met, it seems fitting to write something here to recognise this visionary man and the inspiration he has given many, including us here at Casa Indomitus. 

By sharing his dream of a human world that could support itself sustainably and bountifully Bill created a community of people who work diligently towards that end and that community grows larger and stronger each day. He was so right when he said that,

“…it’s a revolution. But it’s the sort of revolution that no one will notice. It might get a little shadier. Buildings might function better. You might have less money to earn because your food is all around you and you don’t have any energy costs. Giant amounts of money might be freed up in society so that we can provide for ourselves better. So it’s a revolution. But permaculture is anti-political. There is no room for politicians or administrators or priests. And there are no laws either. The only ethics we obey are: care of the earth, care of people, and reinvestment in those ends.”

As we carry out our own ‘quiet revolution’ here in the ancient land, I honour the teacher who has passed on so much knowledge and inspiration. 

Vale Bill Molison, 1928 – 2016. 

The Map Entry

With a project like this, planning is essential and over the years I have created various maps to work out positioning, planting and many other aspects of transforming our yard. In the last year or so though I’ve been working on a more comprehensive image, one which can be used as a base for other maps and will give us a good idea of how things should look when it’s “finished”.

In the last week, I was able to finally find the time to complete the last of the work on this map and convert it to digital form so I could play with it further. The original map is now on the wall in our main room – inspiration for continued productivity.

This map is based on a topographical style so the areas of blue do not represent permanent water necessarily but rather below natural ground level areas which may well fill with water during seasonal downpours. Only the deepest part of the lake is intended to have permanent water to allow for fish and yabbies, with the rest being allowed to evaporate and soak into the ground before being filled again – following the natural pattern for this area. The red lines represent fences and the buildings have cutaways to show floor material and room layout where appropriate.

Large Map Web

A digital image of the finished map.

Click here for a larger version

Permaculture encourages detailed planning so that trees planted are ‘in the right spot’ for their whole lives which are often far longer than those of the planters. One aspect of this planning is thinking about the frequency of use and locating things conveniently so that your ongoing lifestyle can be as relaxed and productive as possible. It’s an interesting exercise to really think about what aspects of your garden you will use more than others, especially when planning for self-sufficiency.

Permaculture Zones

Permaculture Zone mapping for our project

For further information on this method of garden/farm planning see Permaculture Australia or any number of resources available both in print and online.

I have also made some additional detail maps which if you are particularly interested, can be found here:

Location Names

Irrigation Layout

The possibilities for overlays seem almost endless but that will do for playing with this now, back to actually making it happen in the real world.

Beginning to prepare for the larger animals…

As a part of our plan for self sufficiency, we intend to include some larger animals into the mix in the future – for meat, milk, fertiliser and many other purposes. Our location and climate however necessitate a fair bit of preparatory work before we even consider introducing those animals into the fragile environment. Just looking at the local landscape’s reaction to the introduced ruminants of various types (and it’s response to their removal), shows how vital it is to ensure that our block is well prepared for their hard hooves and voracious appetites.

The first stage of working towards being able to provide for the animals we would like to include was the earthworks which shaped the area that was set aside for the animal yards (we will have 3, which will allow for rotation of the different types of animals, reducing each species’ impact on any one area). These earthworks have provided contours to encourage the plantings and also low points which manage water flow from rain events and can be flooded to create wallows for our future miniature pigs.

The second step is to plant the trees and bushes in the zone which will provide the lush environment that will allow our animals to prosper with a minimum of support. The species choice for these areas are predominantly regionally native and designated ruminant fodder options, hopefully allowing for a high yield and low loss. I do intend to spot plant non native fodder species like Bean tree (bauhinia gilva) or Tagasaste (cytisus proliferus) in the lower lying areas, if I can get either to survive to be planted out.

Last year, I began to plant some of these trees, in the area which will become the ‘Front Yard’ but there was still two thirds of the overall area left bare. This year all of that has changed. With our current WWOOFer’s  fantastic help, I’ve got organised this year and we have already planted a total of 280 native seedlings, of which 192 are situated in the animal yards. This might sound like an extreme amount of plants, especially considering the yards comprise of around 2/3 acre. My intention however is to plant this area so densely that when the animals finally arrive, they practically have to eat their way into the yards to move around. In this way I am hoping that we MAY be able to support our small group of creatures without significant outside supplements (and little reliance on the larger local environment).  In fact, both last year’s plantings in this area (120 seedlings) and the ones completed in the last two weeks do not include a couple of species which I have not had luck germinating as yet (casuarina pauper and enchylaena tomentosa) and we also ran out of 3 species this year which would have added an additional 30 or so trees if we had them. Not to worry, I will try again with my seeds over summer this year and we will fill in the gaps next year.

Now the babies will need to be settled in with some new irrigation lines and the growing time begins…

Animal Yards 1 (1)

All three animal yards from the west gateway with our lovely WWOOFer, on his last day here today.

Animal Yards 1 (2)

The new plantings from the east (centre of the block)

Animal Yards 1 (3)

Once these new trees get up in size the fire pit are will be significantly more protected… as will all the areas to the east, including the house.

Animal Yards 1 (4)

One year after planting the front part of this zone the difference is obvious.

I am really looking forward to the growth in these new areas – it will fill out the last major part of the yard which was left bare after the earthworks and greatly reduce the dust, wind and heat profile of the yard. Then of course, there are the animals for which this effort has been expended. Time will tell when the yards will be ready for them – it will all depend on how vigorously these babies grow – but I estimate 5 – 7 years before we introduce our miniature cow to the mix and then we will judge the other animals based on how she impacts the trees, which should be well established by then.

2016 Tree Tally

It’s been a very busy year so far: I’ve added Home School duties to my list with Aurelius beginning class one and we’ve had a couple of great long term WWOOFers who have kept the productivity rolling on the home front but it hasn’t left much time for tree counting and blog writing!

Better late than never though, just before we are about to start this year’s planting push, I’ve done the rounds of the block with my trusty notepad and come up with the final survival figures for last year’s babies.

2016 Tree Tally (Stats)

The vital statistics as they currently stand

So, we had a drop in survival rates this year, which can be attributed to a number of things:

  • Due to our lack of WWOOFers through the planting season last year, although we planted significantly more trees than the previous year, many of them were planted well towards the end of the season meaning that they had less chance to get established before the hot weather set in.
  • The two last areas to be planted (‘Windbreak 3’ & ‘Hecate’s Hill’) were not hooked up to the dripper systems until early November meaning that they had to be hand watered until then. I managed to get it done most weeks, but there’s no doubt that they were less well tended than is optimal. It’s no surprise that the losses were correspondingly more severe in these zones.
  • Mulching of the flat areas was not achieved until January/February (!) and none of the slopes got mulched at all (we used up 3 big round bales of pea straw just on the flats). The ‘Front Yard’ area had germinated a great amount of mustard weed which acted like a natural mulch/shade so we purposefully didn’t weed that and the losses there were less, although that was the first area planted too so they were the best established as well.
  • It was a long hot summer this year. Last year’s summer was mild throughout so none of the trees were pushed to their limits really meaning that our success rate was naturally very high. This year though, we had a number of days well over 50ºC and long stretches over 45ºC. The cooler weather also took longer to come – not really hitting until well into April. This meant that all the trees were really tested by the ambient air temperature, let alone the hot winds that always come with such conditions. Some plants like the Stone Pine which came with practically no roots had no chance, others just pulled through but will hopefully prosper next year with more advanced root systems.
  • On the other hand rainfall levels were fantastic. With the warmer waters of the Indian Ocean adding moisture to the hot El Nino conditions every tree that was well established the previous year has prospered. The minor losses of trees from previous years – of less established plants – encourages me to hope that most of the trees, once they make it through the first summer, can be expected to continue reasonably happily.

All in all I am very happy with the progress so far and it’s really starting to feel like a garden now – there are parts of the yard where you can look up and see green all around you which is a lovely thing. There is also a noticeably increased quantity of birdlife which is very satisfying, watching the ecosystem build up naturally with only the addition of trees. In the next couple of years, I hope we can finish planting the main body of the trees and hit my goal of 1000 trees/shrubs on the block, and as more an more trees get some size to them the shade and wind profile of the block will start changing dramatically. Exciting times.

2016 Tree Tally (1)

Progress of the orchard plantings from last year.

2016 Tree Tally (2)

Progress of the ‘Front Yard’ plantings in about 12 months

2016 Tree Tally (3)

Some of the trees are taller than me!!

2016 Tree Tally (4)

The first tree is about chest height now – starting to looking like a real tree 🙂

2016 Tree Tally (5)

One of my favourite views at the moment: from the back windbreak along the green zone

2016 Tree Tally (6)

A slightly different angle showing the house in the distance and the poultry yards/sheds (nearly complete) at the right.

2015 – 2016 Progress Report

Well, the last 6 months have been busy with planting and the like, we only had a couple of WWOOFers (and only one for 3 weeks of the planting season!) so not as much productivity in that time as I would like, but still, when I went out to take the progress photos I realised that we have still made some significant steps.

This year we have:

  • Cleaned and sorted all the ‘junk’ around the yard
  • Put up the Tank Stand
  • Continued to build the sculptural stone edging wall along the east side all the way to the front fence
  • Done all the stone work for the walls of the Outdoor Kitchen
  • Positioned and connected up the small Header Tank
  • Cleaned down the old stone work in the Outdoor Kitchen and built the sink/bench
  • Planted significant areas with native trees as planned (I personally planted around 250 trees this year – a personal best 🙂 )
  • Extended the Orchard plantings all the way around the play area and along the front end of the western driveway
  • Trenched pipes across the driveway in two more places and connected the new plantings to the irrigation system
  • Grew a patch of barley…
  • Sourced and placed logs for the seating in the Bonfire Area
  • Laid the floor of the Outdoor Kitchen and moved the BBQ in so we could start using it!
  • Finished the trampoline hole and installed the trampoline in the ground where it now gets significant use
  • Dug the hole for Brigid’s Well
  • Put in the posts for the roof of the Outdoor Kitchen
  • Installed a clothesline
  • Built half of the Garden Shed
  • Tried (mostly unsuccessfully) to keep on top of the weeds


We are now looking forward to meeting our new WWOOFer next week and getting some more projects completed. So far, on track to be finished the major yard works by the end of next year…

2015 Orchard Extensions

All the native planting that we have been doing is vital, making up by far the largest volume of trees in the ground to create the general micro-climate changes that come with large tracts of shade and wind break. However, even though the various acacias are tasty for our future cow and sheep they don’t provide us with much direct food for ourselves so some non native orchard varieties are very important.

The difficulty is that there are a limited range of trees which will prosper in our climate and soil profile so a mix of research, planning, preparation and timing is required to increase our chances of success. The first fruit trees planted while we were preparing for the others were hardier varieties – a quince and two mulberries – which could handle the harsher environment while we prepared for the other, softer species.

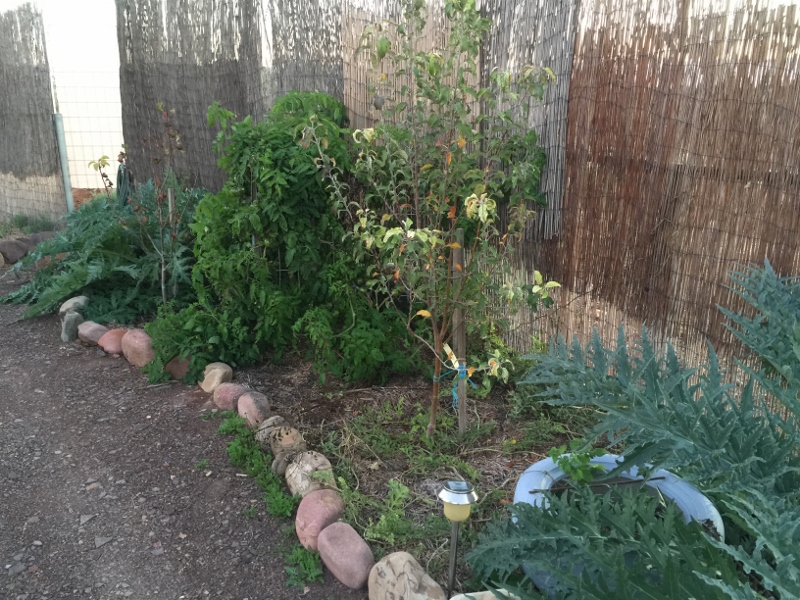
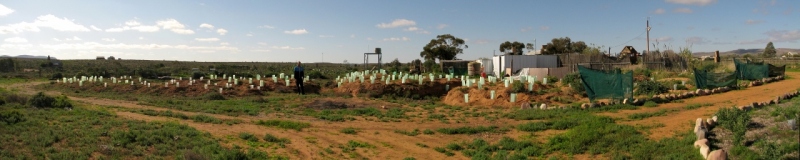
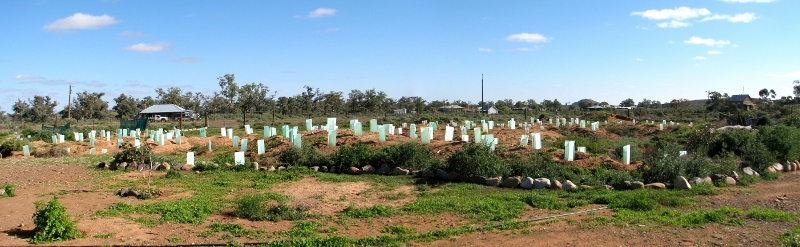
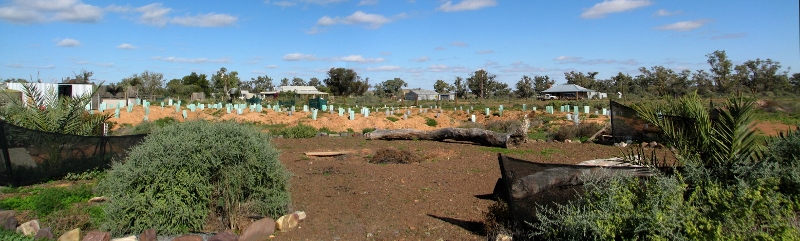
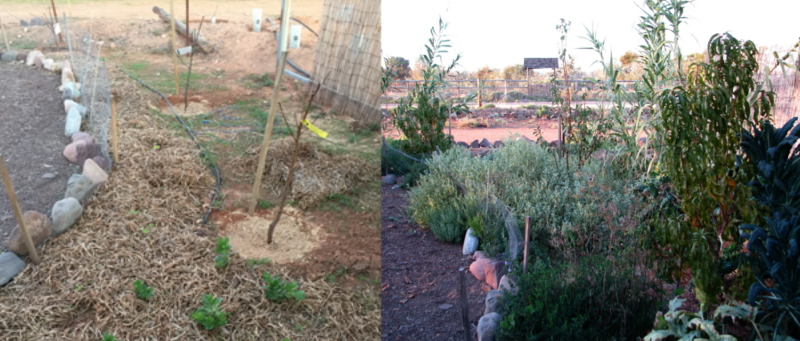
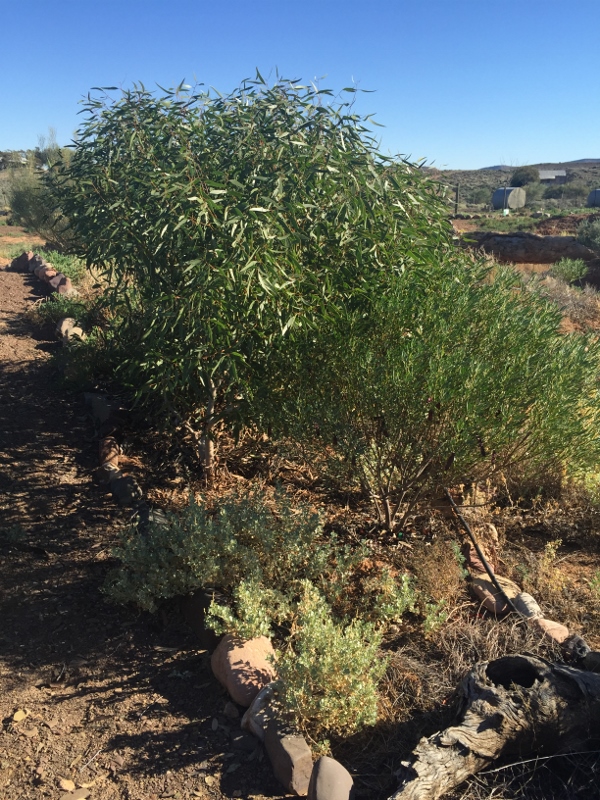
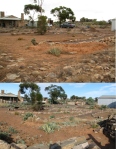
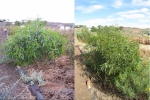
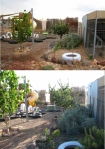
Last year we planted a small arc of the inner orchard, which surrounds the playground. This orchard is designed to have the most protected species in it as it will be within two arms of other trees – the windbreak and the front animal yard – on the western side and shielded from northern/eastern winds by the house and shadehouse. The trees in this area have been planned for a number of years and the soil prepared for at least a year prior to planting so we have only been able to put in a few trees each season. Last year we planted two apples (Jonathan and Granny Smith) a pear (Beurre Bosc) and in the nut orchard on the other side of the poultry yards an almond (Self-fertile paper-shell). Add in some lower storey plants and the result a year later is this:

2015 Orchard (1)

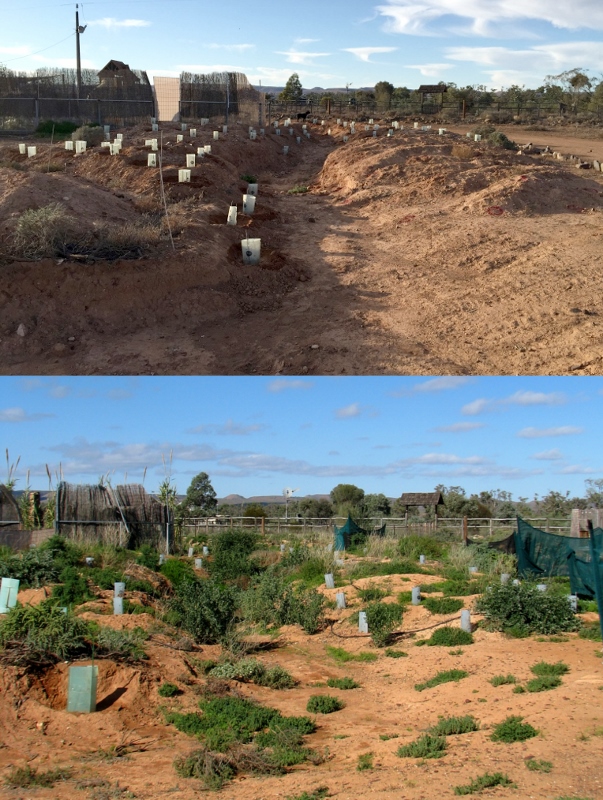
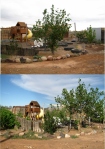
This year we continued in that vein, planting the last of the trees in that arc (except for the cherry that is on order still)  and a couple more nut trees in their area (more there next year). 2015 Orchard (2)

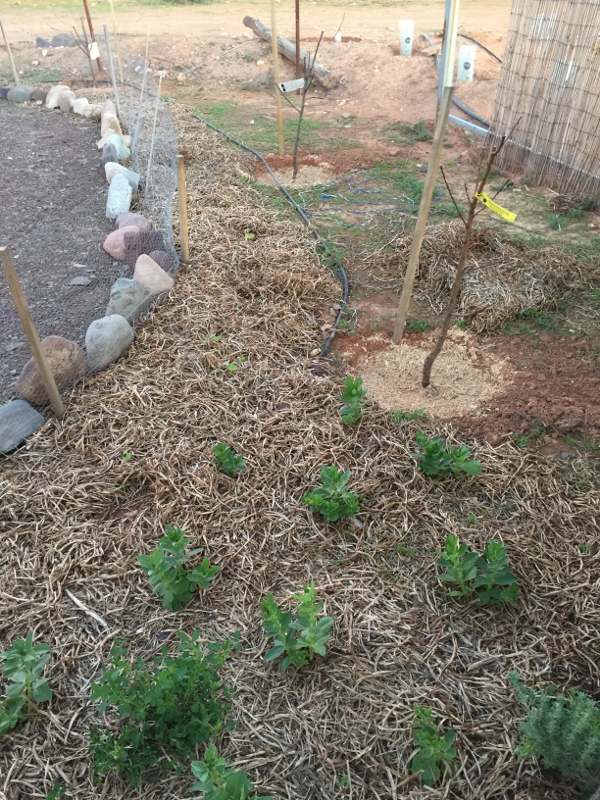
Look at those pretty trees waiting for spring to burst into verdant activity… There’s something very satisfying about planting trees that have been actively worked towards for 3 years now. These trees, finally, here.

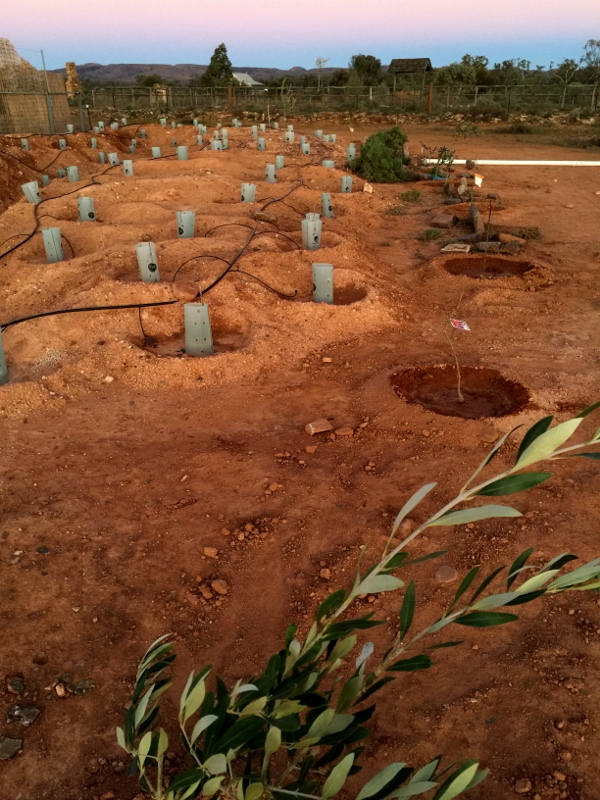
Previously that would have been the end of it and we would be back to the natives. The big difference this year however is that with the push out into the side of the block the outer ring of fruit trees on the plan opens up for planting. This ring is designed for more hardy, climatically suited varieties as they will have some protection from the outer windbreak but will be in full sun all afternoon as the access driveway which encircles the whole yard is directly to their west. When looking for species to plant the first thing to identify is that our climate, and even soil conditions, can be loosely classed as ‘Arid Mediterranean’ so trees which prosper in the hot south of Spain, Italy and Greece, through Turkey and Northern Africa are likely to have a good chance here. The same can be said for similar zones in the other continents.

Therefore, after seeing what was available in that range, we purchased a group and set them out in a pattern around the edge of the driveway. Much hole digging by Noven and they went in over the Solstice, significantly increasing our potential food sources. I’m quite excited by a number of the species in this selection – ones I remember from my childhood like Loquats, Persimmons and Figs, those rich flavours of Summer and Autumn. Olives figure large in the group too and will make a welcome addition to the pate and quince paste on our cheese plates in years to come. I’m also very excited by the Jujubes, these are not a fruit I’ve dealt with much before but I really enjoy the flavour (like a date but with a light, almost mousse-like texture even when dry) and I have local friends who have had success with them. The last species in the arc is Pomegranate, which grows strongly in this area and will provide protection for slower neighbours as well as beautiful flowers and lovely fruit.

2015 Orchard (3) 
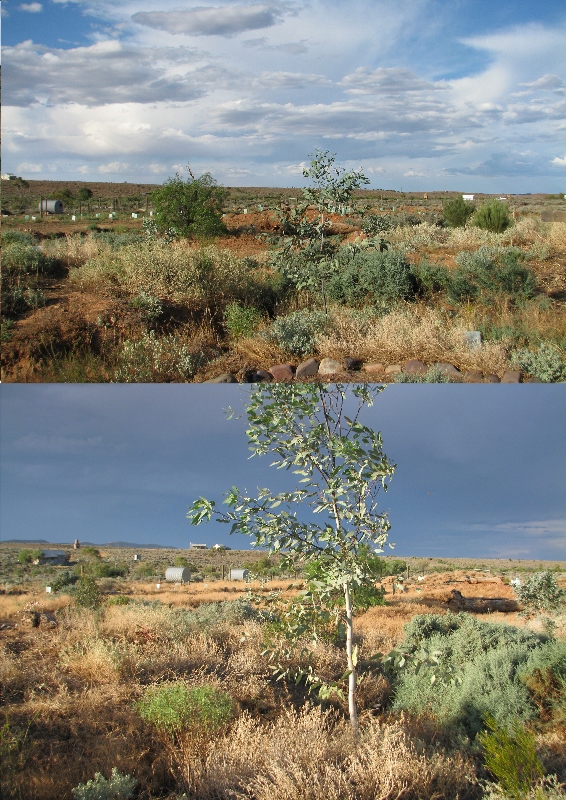
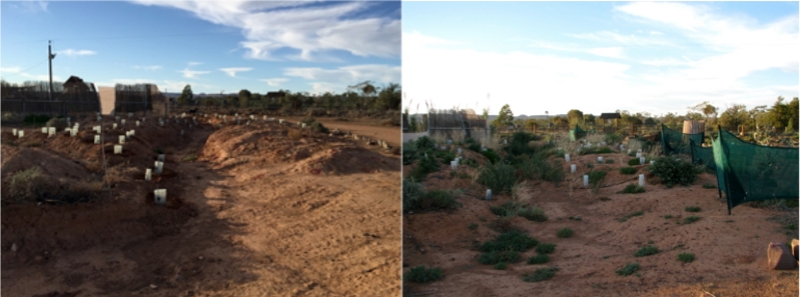
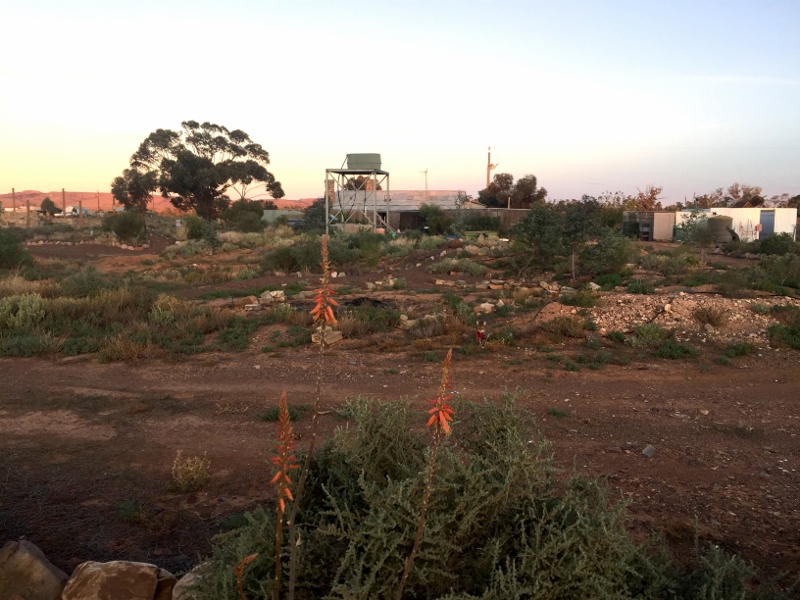
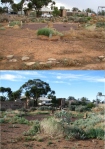
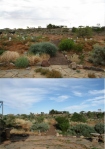
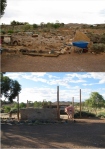
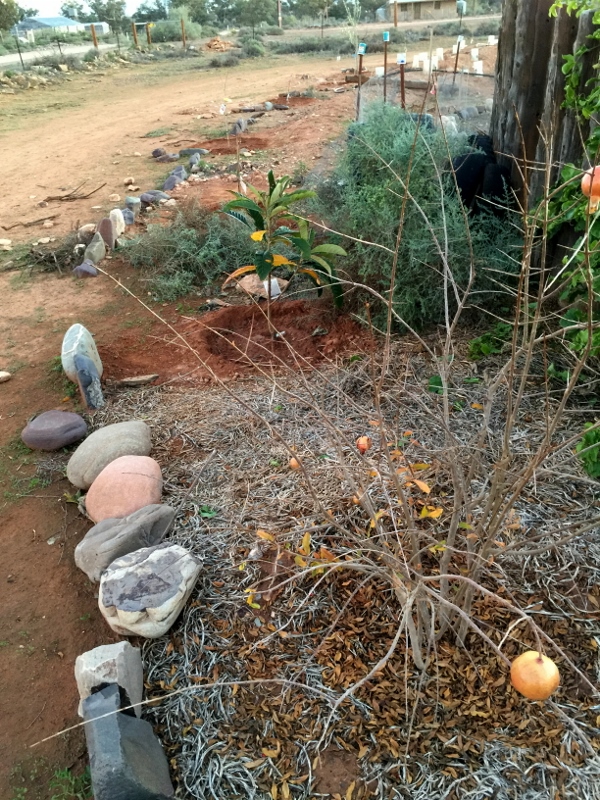
Looking West with the driveway turning to the north. Note last year’s pomegranate proving it’s vigour.
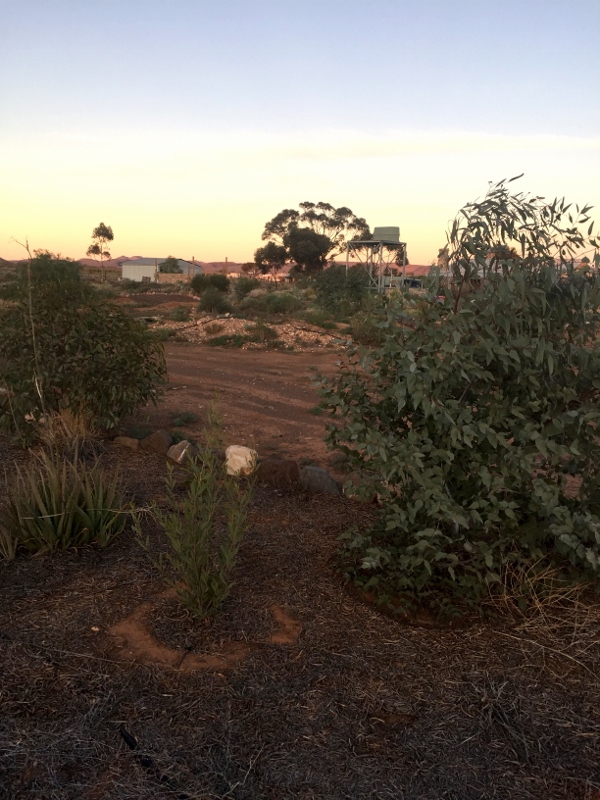
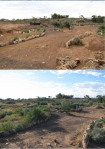
2015 Orchard (6)Looking South

The Nursery that we sourced the trees from also listed a Native Lime which, when I queried them I was delighted to discover it was indeed the local ‘Bush Lime’ not the more tropical Finger Lime. These trees are quite hard to find, but being a regionally native true citrus they are not an opportunity to miss. They do come with one rather large warning though…. they are very, very prickly. Some spines are as long as 8cm! 2015 Orchard (4) 
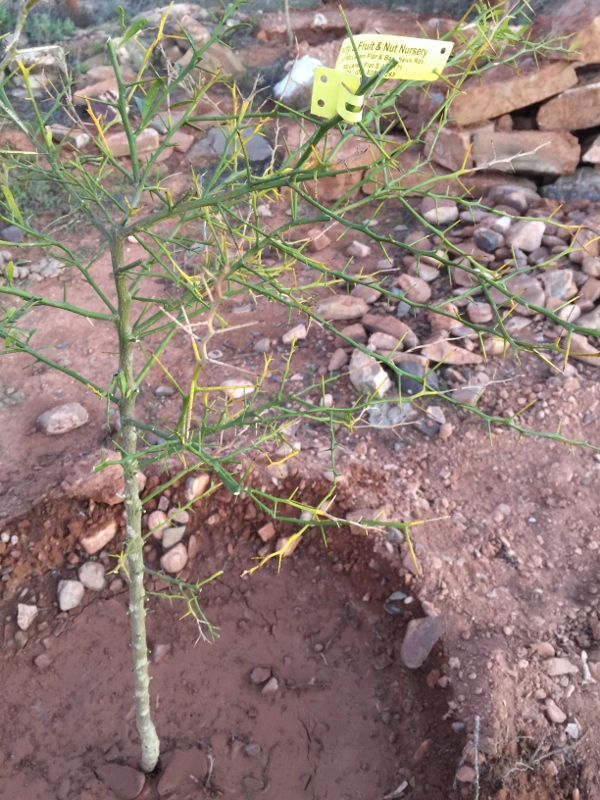
I pruned the ones on the trunk off for transportation.

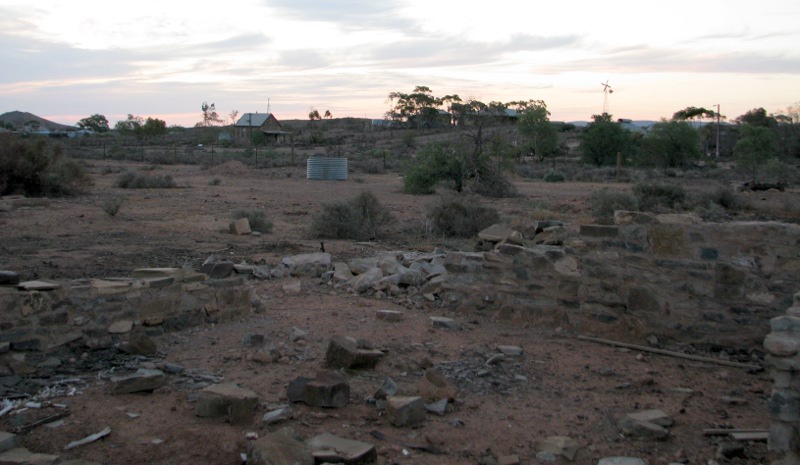
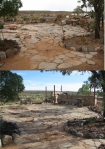
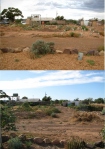
The limes hadn’t been in the plan yet to be honest, but I was quickly able to open up the last official orchard zone in the yard – the area along the front fence on the side block. This zone will mostly be planted last as it is needed as a staging area for the future house renovations, but the far end can be done now as an extension of the western windbreak which was next on my planting schedule for this year anyhow.  Some quick excavation of the old stone wall and building of the western end of the sculptural wall which will replace it and the area for the limes was ready. You can just see their spindly trunks in the picture, but hopefully they will grow quickly as they are quite beautiful mature trees. 2015 Orchard (5)
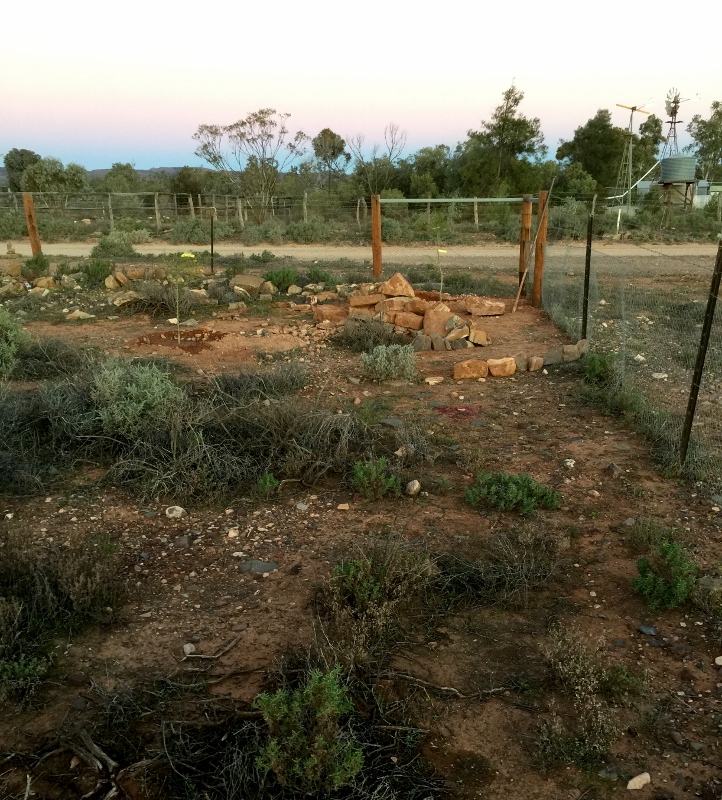
Of course now I’ve ordered a few more species to join them in that corner so there will be another, smaller, wave of fruit tree planting in amongst the natives that fill the rest of the season.

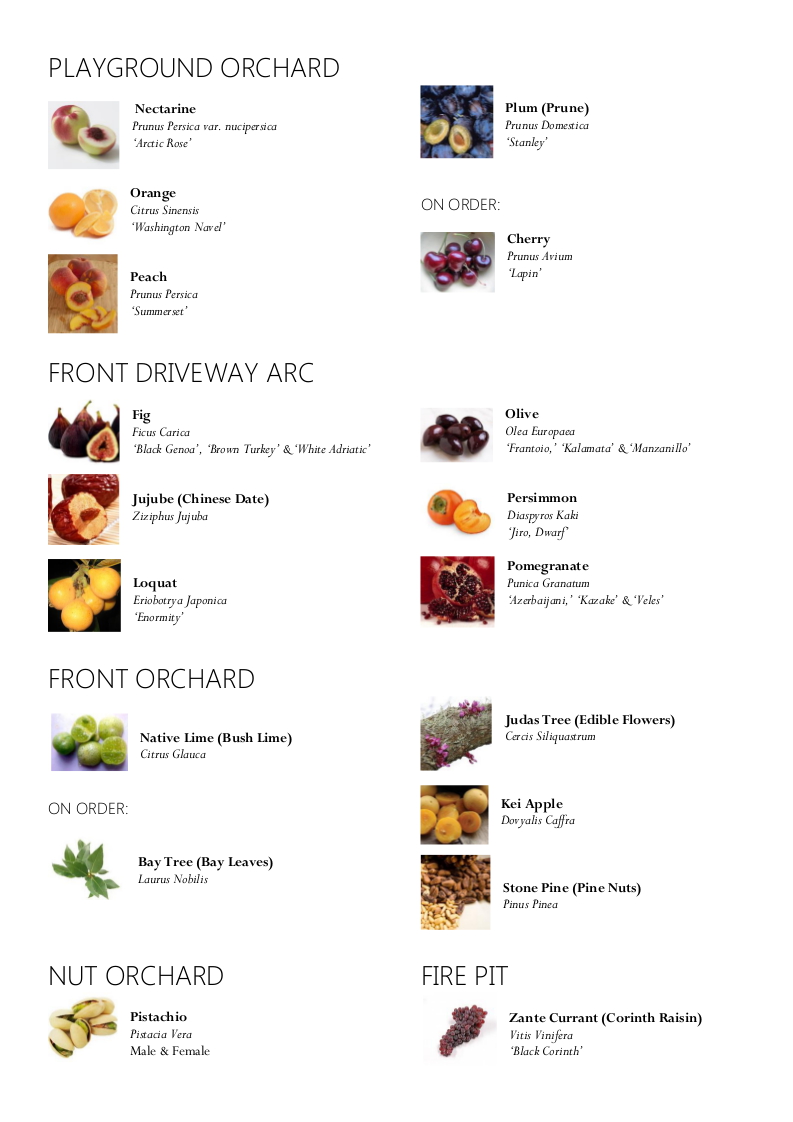
For those who are interested, here is a full list of trees planted in this round and the remaining trees on order for these zones:
2015 Orchard Variety List

The Planting Begins

I’ve been doing little bits of planting in the last month or so – replacing losses in the existing areas and beneficial bug attracting flowers like borage mainly. It is May though, so I really needed to get started on the main push of planting even though we have not had success in attracting a WWOOFer to help at the moment (we are still looking if you are interested!) and we are missing a couple of parts for the irrigation extensions required.

The planting days on the biodynamic calendar rolled around so I took the plunge with hopes of getting a good start on the ‘front yard’ area. I laid out the plan, counted the trees required (120!!) and started the process of soaking them in seaweed solution to prepare them for the indignity of having their roots exposed however briefly.

Enlisting the 4 year old wrangling assistance of Noven on Friday and Saturday I set myself up over on the hills and began…

Planting Start (1)

Working as consistently as I could I managed to get 88 trees planted by the end of the day on Saturday (I had to water the last ones in the dark). All the new babies have tree guards and are planted in their own personal swales, however they still need drip irrigation and mulch to be set up for their first year in the ground so there’s quite a bit more to do in this area as well as the rest of the planting.

It does make an immediate difference, even though they are less than 20cm tall – this morning, I stood in the valley surrounded by the new plantings and it felt like there were trees there, making the shape of the land I had created seem a little bit more real somehow. I am looking forward to their growth and how it will effect the rest of the gardens to have this buffer of planting to the west.

Planting Start (2)

Outdoor Kitchen – Stage 2

Earlier in the year I wrote about how we had progressed on the construction of the first mortared stone masonary project: the Outdoor Kitchen

After much continued work around our other tasks I am happy to say the the next stage of this project is complete, meaning all the stone work for the structure is done!

There was a fair bit involved to get to this point, first as soon as the walls were up to height Kellie and I donned our stunning protective gear and wire brushed the walls in preparation for pointing them.

Outdoor Kitchen 2 (1)

This was necessary as all our hard work was based on three sides on the work of the previous owner who had used a more lime rich mix for his mortar and it had therefore degraded quite seriously in some areas. No point doing all the work on top if the bottom falls apart over the next few years.

Then, having got completely covered in dust we proceeded to put back what we had just scrubbed out, but with new strong mortar. Then, scrubbing back the rocks to neaten up the joints….

Outdoor Kitchen 2 (2)

Click image for a larger version

The last photo in the series is after the acid wash, but before that could be done we had to actually finish the stone work – the walls weren’t the end of it, we needed to build the structure on which to install the large cement sink we were re-purposing out of the tiny laundry where it was far to big and put in a bench using a large piece of slate.

Kellie and I worked diligently at it but it was just to the point where we could put the sink in when Kellie had to move on so we said our sad goodbyes and work slowed noticeably.

Over the next month I worked slowly at finishing the structure and then finally (with heavy lifting assistance from Noven) the sink and the bench were in!

Outdoor Kitchen 2 (3)

Next step: Acid wash. Stinky (even with an acid vapour respirator), slightly scary but well worth the effort for the resulting clean stones.

Moving right along now that the end was so close in sight, I laid a small section of mosaic in the final join of the bench and sink to the wall. This will tie in to the mosaic using the same tiles in the slated area directly next to the structure.

Outdoor Kitchen 2 (4) Outdoor Kitchen 2 (5)

Finally the last step! Sealing the top of the walls and the area behind the benches to protect it from spills and the harsh environment. DONE.

Next steps: Plumb the sink outlet, lay the floor and then the roof and a resin top for the slate bench… I really hope to get this completely finished in the next few months… when we aren’t planting trees. In the meantime this is where we are at:

Outdoor Kitchen 2 (6)

This is the corner where the BBQ will be positioned. The utensils hook is an old garden fork I found half buried in the yard. I’m very glad it was points down when I found it and that it’s been reused where it’s not going anywhere now.

Outdoor Kitchen 2 (7)

Outdoor Kitchen 2 (8)

The Lull Between Seasons…

Autumn Equinox has passed and the weather is definitely heading towards the cold side to the scale now; tops between 20 – 30  and lows between 6 – 18 meaning that the new planting season is beginning. Seeds are in for the winter vegetables, masses of greens, roots and autumn germinating perennials like Jojoba and some little babies are starting to show their heads. The main body of the planing however will, as always, be the native trees that we have been nurturing over the summer. They won’t be ready until the start of May so April is a blessed rest month where we can take stock of what worked last year and see how much survived the summer.

With this in mind it is time to do the tally and see what our stats are like for the season just passed (and compare them to previous seasons)Tree Tally (1)

As you can see, we’ve been having some fantastic improvements in survival rates over the 3 years we’ve been planting so far. I have to attribute it to a range of things including; getting dripper irrigation to every tree and shrub without fail, mulching extensively, tree guards and shade barriers and very importantly, a cool summer. We will do everything that we did last year this time, and while we can’t count on the cool summer we can prepare for the heat and every tree that survives casts shade and catches wind which helps the next ones grow.

I’m hoping to plant a further 4 main sections this year (2 segments of windbreak, the front animal yard and Hecate’s hill) as well as replanting those that didn’t make it through the summer so hopefully our block will look that much greener in a year’s time.

Tree Tally (2) Tree Tally (3) Tree Tally (4) Tree Tally (5) Tree Tally (6)